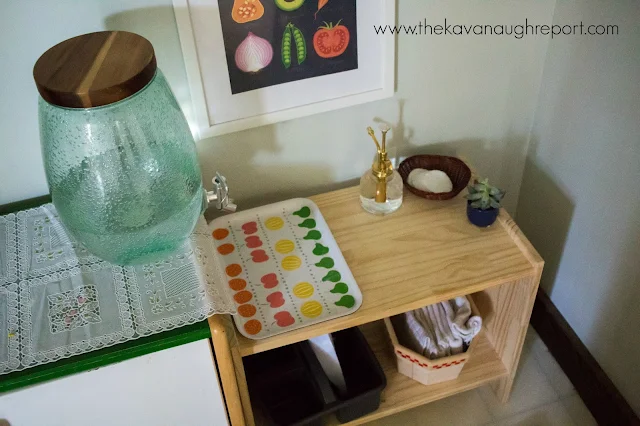
The link between access to water and independent children is palpable. There is no way to deny it. By giving children access to water, we give them the ability -- should they want to exercise it -- to perform so many daily tasks. From simply drinking when they are thirsty to mopping the floor, water is key! Giving access, however, can feel overwhelming. But, by creating a Montessori water station in your home you can take some control over the situation.
Now, there are many ways to create a "water station." It does not have to be a real small working sink or some other elaborate set up. Choose a water source that is appropriate for your children. This could mean a beverage dispenser {as I discuss below}, a really small pitcher, the kitchen sink, or whatever solution you have for your space. What works for me, may not work for your space or kids. Follow YOUR children.
Creating a Water Station
With all that being said, practically, here are some things we have done to help create a water station with a beverage dispenser that minimizes the mess and maximizes independence.
Water Source
Choose a beverage dispenser that works for your space. We have chosen a plastic dispenser from Target. I liked it because it is still beautiful and looks like glass (with a real wooden top) but eliminates risk of a gallon of water and broken glass shards all over if a fall occurs.
The downside is that it's lighter weight and slides around more than a heavier container would. I have found that ensuring there's a decent amount of water in the container has helped with slipping around.
Additionally, make sure it's a spout that your children can actually use. Not all spouts are created equal or work the same. If you can test it out in the store to make sure your kids can use it.
Non-slip
Place a non-slip pad under the water source. This helps to eliminate movement from the container and make things easier to use. I have a non-slip vinyl fabric, but simple shelf liner would also work nicely.
Space
Plan for space between where you want the cup/pitcher/bowl to rest and where you have your spout. I find it difficult, especially for young children to be able to hold and turn the dispenser on and off. Having a space to rest makes a big difference. Just make sure there is adequate space for something to rest and not be crammed or knock over the dispenser.
Tray for Drips
Spills/drips/accidents/leaving the spout on will happen. Just accept that. IT WILL HAPPEN. But, you can start to minimize the mess by placing a tray/bucket under the dispenser. We have a small tray with raised sides but for a younger child, or child new to such independent access, a small bucket may be a better choice. Then, you can empty the bucket/tray as needed.
Clean Up
Keep some tools for cleaning up nearby. This may be a mop, or just rags for wiping up spills. Make sure your children are starting to help with this too so that it doesn't all fall to you. They will eventually start to help with the process if you are modeling clean up for them from the beginning.
Remember, that your space doesn't need to look exactly like my space. Follow your child and work to give as much independence to your child as possible!
Don't miss the other articles in this series: THE LINK BETWEEN WATER AND INDEPENDENCE | REALITIES OF WATER USE IN A MONTESSORI HOME
Have you created a Montessori water station? Have any tips to share?


